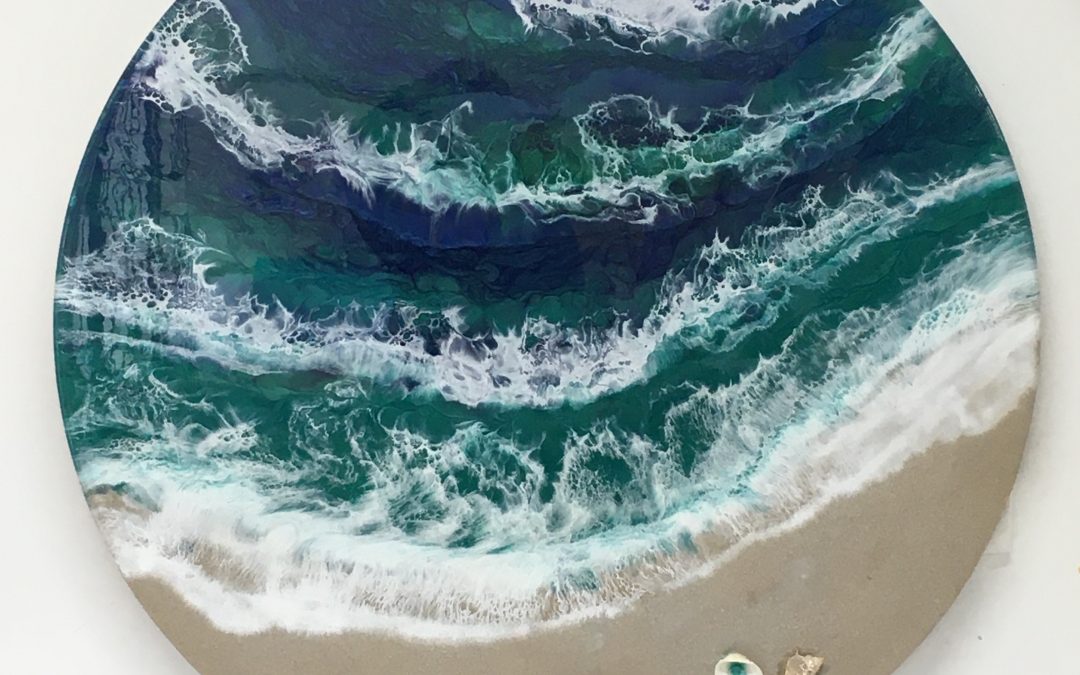
At 90cm in diameter, this round resin art is my largest beach scene. I wasn’t going to create another resin beach art tutorial, however, as I have added the sand in a different manner and loved the results, I felt it was worth sharing.
For this project, I added the sand after pouring the resin. This method worked well for two reasons, one, the colour of the sand didn’t darken too much and two, you can still feel the rough sandy texture. The contrasting smoothness of the resin and the roughness of the sand, work very well together.
I will be using this method again in the future.
For a more in-depth video, join my members’ only club, Sue’s Creative Circle (https;//courses.suefindlaydesigns.com.au). By joining Sue’s Creative Circle, you get access to not only my exclusive videos, but you will also be able to download printable resources to help you on your resin journey.
Products used in this project:
-
1 x 90cm round MDF cradleboard
-
Sand from my local beach: https://amzn.to/3lfzwbG – US
-
Liquid Glass Resin from U Resin: http://bit.ly/LiquidGlassResin
-
Vivacious Powder Pigments (Value Pack): http://bit.ly/valuepack2
-
Mineral Turpentine: Alternative Product: https://amzn.to/3eDZpyG – US | https://amzn.to/3dsKyHp – UK
-
Shells: https://amzn.to/30qKgfy
Check out my Amazon shop for a list of alternative products: https://www.amazon.com/shop/suefindlay
✅ Step-by-step Instruction Manual: https://bit.ly/SFDGuide16
🆕 New Members’ Only Club – Sue’s Creative Circle… Register your interest at courses.suefindlaydesigns.com.au
📚 Books
The Essential Beginner’s Guide to Resin Art Techniques.
eBook: http://bit.ly/resinguide
Paperback: https://amzn.to/2XEmqxn (US) | https://amzn.to/2NMKAkY (UK)
My Goal Setting and Action Planner for Artists.
eBook: http://bit.ly/suesgoalplanner
Paperback: https://amzn.to/3bb8gXN (US) | https://amzn.to/31vg3vg (UK)
*Sales from my books go towards funding my YouTube resin tutorials.
Thank you for your support.
* Note – As an Amazon Associate, I earn from qualifying purchases. I realise that not everyone has access to the shops I have locally, so I have taken the time to find alternative products on Amazon and provide you with links. Please also note, I haven’t personally tried all of the product links, due to location, however, my aim is to help speed up your creative process by providing these links. Every time you click on a link and purchase a qualifying item, I receive a small commission, this payment helps to keep my tutorials free for you to watch.
If you would like to access my videos before everyone else, then please sign up to my newsletter: http://bit.ly/SueFindlayNews.
Other Handy Links:
✅ Website: https://suefindlaydesigns.com.au
✅ Resin Blog: https://suefindlaydesigns.com.au/blog-2/
✅ Facebook: https://www.facebook.com/suefindlaydesigns/
✅ Facebook Group: https://www.facebook.com/groups/382098942273408/
✅ Instagram: https://www.instagram.com/suefinart/
✅ Pinterest: https://www.pinterest.com.au/Suefinart/
✅ My other YouTube Channel: https://www.youtube.com/channel/UCvaXBNVp_TrW6HqeARV1nbw
I hope you enjoyed this video.


I mixed white dye with white alcohol ink and it was like water. Went everywhere. What are the portions and do you mix it with resin first?
Hi Cindy
Make sure you add less than 10% in with the resin> Otherwise, it may not cure and you will end up with a sticky mess.
Kind regards
Sue
Sue,
I have a sticky mess (of my own doing) is there any way of fixing it? Can I pour over a slightly not dry piece.
Hi Barb
I wouldn’t recommend pouring more resin over the top.
You need to scrape off the sticky resin and clean as much off as possible.
Only then, can you apply a fresh layer of resin.
Good luck.
Sue